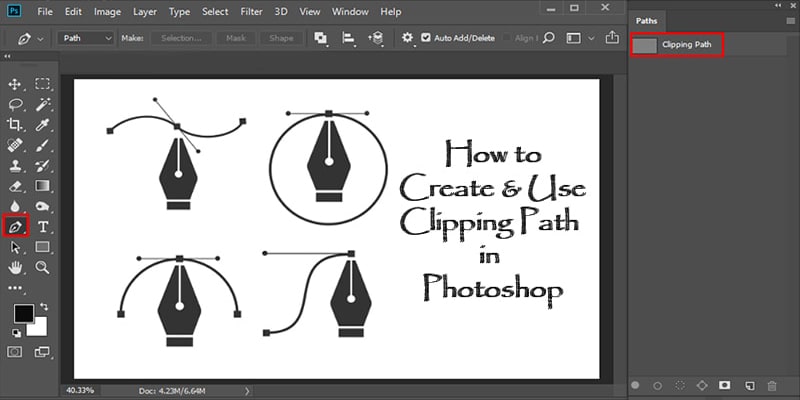
How to Use the Photoshop Pen Tool to Clipping Path Perfectly? The Photoshop Pen Tool is an image editing tool which is used to create paths and shapes that can be photocopied and maneuvered to make selections, masks and objects. The Brush Tool and Pencil Tools in Photoshop draw pixels onto your picture, whereas the Pen Tool always creates a vector path. These paths are shown as Work Paths or Shape Paths in the Paths Panel.

Among all the photo editing applications out there, undoubtedly Photoshop is the best. However, some might find using Photoshop a bit complex; because it is complex, unless you know which tool is used for what and how to use them. For example- the Pen Tool in Photoshop is used to edit images, but how to use it?
In this article, we will show you how you can use the Photoshop Pen Tool to edit perfect images. Let’s begin.
What is the Pen Tool in Photoshop?
As we have said before, the Pen Tool is an image editing tool which is used to create paths and shapes that can be copied and maneuvered to make selections, masks and objects. There are four different Pen Tools in Photoshop CC 2019 which you can use to create a new path. They are-
- The standard Pen Tool
- The Curvature Pen Tool
- The Free form Pen Tool
- The Magnetic Pen Tool (visible when the settings of the Free form Pen Tool is adjusted)
Pen Tools that are used to modify an existing path are-
- Add Anchor Point Tool
- Delete Anchor Point Tool, and
- Convert Point Tool
Where is the Pen Tool located in Photoshop?
The Pen Tool can be found on the lower half of the Toolbar. There are six separate Pen Tool options in both Photoshop CC 2018 and 2019. The older versions of Photoshop may have only five Pen Tool options. Just click on the Pen Tool in the Toolbar and you’ll see them. To access the Pen Tool from your keyboard, just type P.
What are the uses for Pen tool?
The many ways you can use the Pen Tool is really amazing. You can remove the background from the image or select a portion of the image to change its color with the Pen Tool. You can also alter, store and use the paths again created with the Pen Tool as many times as you want. In addition to that, you can create several paths within an image and path segments within a path.
To select specific portions of an image, you can create custom shapes on that image by creating shape paths with the Pen Tool. Shapes created with the Pen Tool can be controlled in any way you want, something that cannot be done with the standard Shape Tools such as the Rectangle Tool or Ellipse Tool.
Where to find the Path in Photoshop?
After you have opened the Photoshop app, bring an image on the timeline and you will see the Paths tab on the Layers Panel- to the right side of the timeline.
If there is no Paths tab on the right side of the timeline, then click Windows tab from the menu on top and there you will find the Paths option.
How to use the Photoshop Pen Tool to create a path?
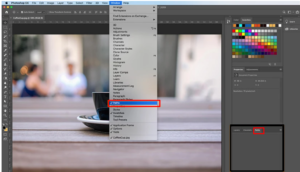
With the standard Pen Tool, you are able to create straight and curved paths accurately. Choose the standard Pen Tool to create a path that you can then use as a selection, and then choose Path in the options bar drop-down menu at the top of the application window.
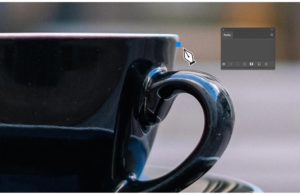
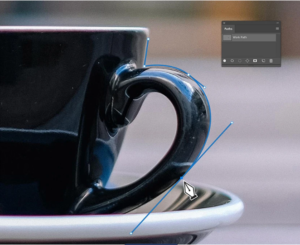
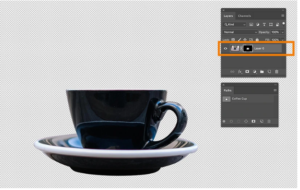
- Click on the image with your mouse where you want to start your path. Select a starting point that is at the frame of a straight line, such as the edge of the coffee cup in the image below.

- Click along the edge of your image with the Pen Tool to draw the first segment of your path. A straight line will appear. A Work Path will show up in the Paths panel when you place the second point.
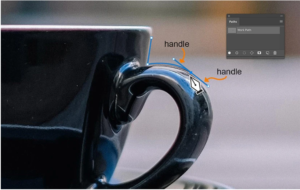
How to creating a curved path segment with the Pen Tool?
- Click to create the next point and drag with the Pen Tool. Now release the mouse button. You’ll see lines appear. They are called handles.
- After clicking the next point, drag the mouse to create new handles and modify the curve that shows up with the new point.

How to close path with the Pen Tool?
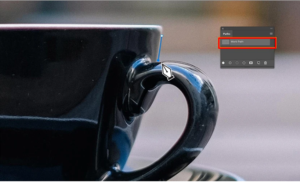
· Linger the Pen Tool over the very first point you set down. When you see a small circle showing up to the right of the Pen Tool, click on the point. The path will be closed.
· Go to the Paths Panel and search for a new Work Path. Double click on Work Path to name your path. Click OK. It will be saved.
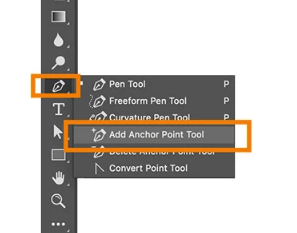
How to add new points to a path?
- Click on the Pen Tool in the Toolbar. Select Add Anchor Point Tool.
- Linger over the path and click to create a new point. Now you can use the Direct Selection Tool to modify the point’s location or its handles.
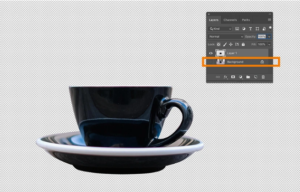
How to remove background using the Pen Tool?
You can remove background in two ways.
- Type CTRL+C to copy the selection and CTRL+V to paste the selection. The selection will be visible automatically in a new layer.

- Click on the Layer Mask icon to automatically create a Layer Mask.
FAQs
-
Where can I find the Pen Tool in Photoshop?
The Pen Tool can be found on the lower half of the Toolbar. There are six separate Pen Tool options in both Photoshop CC 2018 and 2019. The older versions of Photoshop may have only five Pen Tool options. Just click on the Pen Tool in the Toolbar and you’ll see them. To access the Pen Tool from your keyboard, just type P.
-
What can I use the Pen tool for?
Photoshop Image Editing Service basic step that you can remove the background from the image or select a portion of the image to change its color with the Pen Tool. You can also alter, store and use the paths again created with the Pen Tool as many times as you want. In addition to that, you can create several paths within an image and path segments within a path.
-
Where to find the Path in Photoshop?
- After you have opened the Photoshop app, bring an image on the timeline and you will see the Paths tab on the Layers Panel- to the right side of the timeline.
- If there is no Paths tab on the right side of the timeline, then click Windows tab from the menu on top and there you will find the Paths option.
Hopefully, this answers your question how you can use the Photoshop Pen Tool to edit perfect images. Try it step by step repeatedly. Once you can learn to manage the Pen tool, editing images will become a piece of cake for you.
How to Use the Photoshop Pen Tool to Clipping Path Perfectly?
Published By
CPP Graphics Media
You May Also Like Our One of Famous Post
What are professional photo retouching services?


An excellent guide to using the Photoshop Pen Tool. Thanks!